Okei. Next challenge - bonnet. I think at first I was seriously considering buying it as despite my luck with tricon hat foor Robe a'la francaise, hats are scary.. Hats sound like very complex things and I have no honest idea how to make. And the last hat - I mean, I actually had the base. This time there would be nothing.
But again, I decided to brace the challenge, google around and then I found a blog post how someone made bonnet out of cereal box. Apparently the creativity was the key.
I started with newspaper and trying to make myself the patter (as I was running out of time and if I had ordered a pattern it would not have reached me on time). Then cutting it out and trying the "paper" bonnet. I found a very small pattern out of internet and I used the "square method" to enlarge it.
Then, I had artificial leather that I thought to be heavy enough to support my main fabric. I was totally wrong. I spent some more time in google and I learned that originally those were made using wire. Luckily I had wire in my basement that I once used to make chainmail. It was strong and I used tuck tape to "tape it" in place. The result was quite sloppy but at least the bonnet was holding its shape.
I then added some extra wired to the "middle" part of the hat to help those parts also in shape.
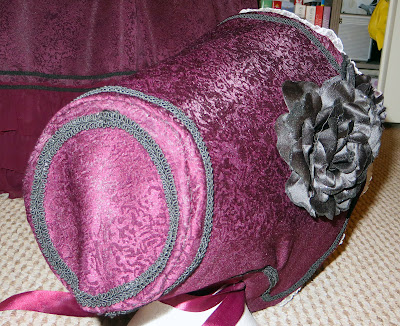
Then, it was back for sewing, that I felt more comfortable. I used the main fabric for the outer layer of bonnet and then the lining for inner layer. I got pregathered laced and added a layer of it into the lining and two lines of the black ribbon I used everywhere on the outer layer to match the style.
And as you can see, I added a black rose and velvet ribbon.
The tricky part, I would say, was putting the fabric over the frame. As I had that white pre-gathered lace at the end, I had the only option that the "opening" will be at the back end. Sewing the "circle" into the place was another nightmare and in the end, it took a lot of sewing by hand to fit it there. Also, I then basted the edges by hand to make sure it would not start moving. A lot of hours. Trying to get the needle through that thick artificial leather and tape was a nightmare.
Result:
As you can see, the back is not perfect here. It took some time playing with the fire to get rid of that fold. But overall - I made a bonnet.
(But I never thought how to wear it.. when I actually got to the larp and put the dress on with proper hairstyle, the bonnet was falling off my head all the time. I tried hair clips to hold it but no.. so, in the end, I just put the bonnet over my bun but I was not sure it was meant to be worn like that)
<<Previous | Next>>


