So, when main part of the dress was done, the next step were the sleeves. When I started the project, the sleeves were the one thing I was most excited about but it was nightmare to make in the end. Any other kind of sleeves during Renaissance area would have been easier to make, I think.

First, I started with the bottom part of the sleeves that is solid and reminds common sleeves. I used pattern from another dress to make this. Then, i modified them slightly to facilitate the buffs at the sides. I tried the pattern on and it looked fine. I made first version of the sleeves, sew (by hand) the ribbons and silver thread on them, added lining and strips and tried it on to realize that the wrist area is way too small when trying it on with underdress and huge sleeves on it. So - REDOING!
I made the wrist area much larger and I was afraid it is too large (no, I should have made it slightly larger). I had limited supply of the green ribbon (I was so lucky I found ribbon with such a matching color), so I undo it from the first run of sleeve and sew it again on the second run. Silver thread took a lot of time, again.
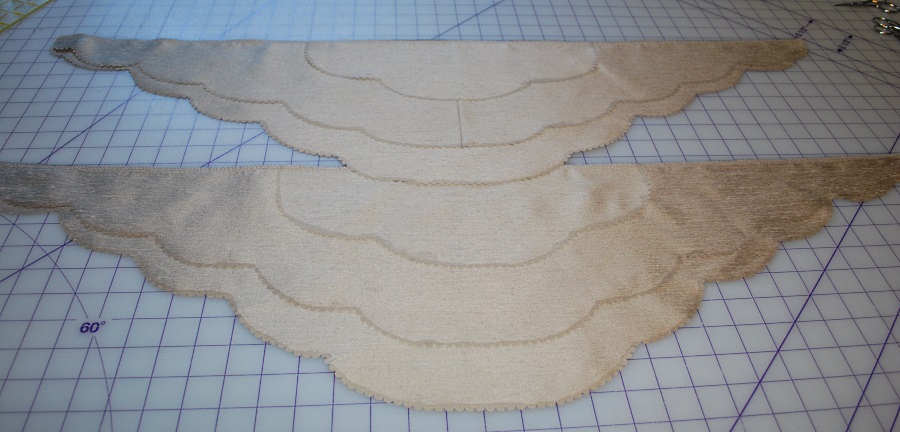
 For the lining I used the base fabric I used for printing (lightly yellowish) and I added adhesive fabric to it to make it stronger and keep the shape. I went to fabric shop and got myself the strongest adhesive fabric I could but that was way too strong and it did not stuck to fabric. I tried it on some other more natural fabrics and it worked very well there. But it was almost like a board. Very stiff. So, I used slightly stiffer adhesive than I normally do but not the super strong version I thought I will use.
So, the main parts of the sleeves consist of three layers - printed fabric, adhesive fabric and lining. It was still lightweight but nicely keeping its form.
Most of the time I worked with flat sleeves but in the end, I needed to sew together the some of the sides and make sure that the ribbon (using pattern to make sure it is straight was really good) and the pattern match on both sides was slightly tricky. I am just not good at all doing things very precisely. Again, basting.
The top part of the sleeves, around wrist, I sewed by hand - it was easier to control the hole situation that was slightly tricky.
Then, when the bottoms were done, I started working with the ribbons. As the main sleeve was lined, so were going to be the ribbons. I considered cutting the lining from the yellowish fabric I used for the printing but I was not sure it is stiff enough and could I be sure that all the ribbons are going to be exactly the same size. So, instead of using the yellow fabric and adhesive fabric for stiffening, I bough right color ribbon from the fabric shop. I had to visit few of those to get ribbon with right color and width. Again, I needed a lot of it. 12 stripes per sleeve. So, that made sure that all the stripes are going to have exactly the same width. Then, I cut out the main stripes from the fabric. Using the patterned fabric, it was easy to make sure they are straight. With mint green, it was trickier. In the end, I had lot of strips. Again - hand sewing! I needed to apply silver cord to all the sides. That was 24 meters and more I think. I managed to ping-watch another show while doing it (was in Narcos?). Then, I basted the main stripes over it and used machine to sew those together.


And when the cords were done, the silver thread came. It is visible from the reference images that the patterned fabric on the sleeves is covered with silver thread following the pattern. For one stripe it meant two silver threads that have to follow the shape - (not many straight lines). At one point, the both threads follow single line. I first tried to come up with a solution where there is only single thread on those places and two on others. But due to the material trying to unwind as soon as I cut and using knots was the only way to keep it in form, I decided to go with two stripes and trying to hide that there are double cords on the areas where only single line is visible.
So, 12 stripes with 2 threads per stripe. Another show ping watched (I think it was Underground?).

Then, when the stripes were finished (I would say the stripes took longer than tiles on the skirt), I needed to make sure I have them in right length. Because I had no pattern for it, I did some research and the way people seemed to do those were that they used usual pattern for sleeve and just enlarged it (mostly to the height). So, it was just gathering the stripes, basting then to the ribbon and testing to make sure I have normal looking sleeve. I realized that most of my stripes were too long. Even now, when I cut them, I think I could have cut them slightly more.
When I had perfected one sleeve, it was easy - just undoing the basting and copying it to the second set of stripes. To keep the ribbons on place, I used machine to sew the gathered stripes to the green ribbon. I got those kind of flat sleeve looking things. Then I needed to connect them - at first, again, I did not thought about the underdress. They were fine on their own but the underdress and its sleeves actually add a lot of volume. I only discovered it when I already had some pearls added (I needed a break from the sleeves at one point so I went on adding the pearls. It was more fun than dealing with those nightmarish sleeves) - so it was not very comfortable to redo it. Luckily I had enough ribbon at this point.
The second problem, again, me not thinking, was that the sleeves were sewn to the main part of the dress and did not used ribbons to connect as I first had assumed. So, I had to undo the armpits of the main dress and sew the ribbons to the lining and then, carefully, handsew the green fabric to its place. The result was nice :)
One problem arose - the sleeves were losing their shape when I put it on. I did some research and It seemed most people sew the undergarment sleeves onto the main dress and connected it to the sleeve to keep the shape. I wanted to have the fluffy feeling so I had two options - have three layers of fabric (stripped sleeve, fluffy undergarment and base sleeve) or have two layers and use stripes to keep the sleeve shape. I went with the second. But that mean that I was going to redo the underdress (as the itchy fabric was horrible to wear, it sounded like good prospect). I removed the sleeves, sew them by hand to the main part of the dress, fixed the fluffiness by basting it to the ribbons connecting the stripes on the sleeves. Then I added to ribbons per sleeve to (one at the top, another at the bottom) to keep the sleeve in the pace. It was lot of inventing but it worked.
The final step of the sleeves were to hand sew the bottom part of the stripes with bottom sleeves. I made the undergarment sleeves slightly narrower at the end so that they would fit into the bottom sleeves. I loved the volume they added to the stripes but it was too much extra volume for the bottom.

First, I started with the bottom part of the sleeves that is solid and reminds common sleeves. I used pattern from another dress to make this. Then, i modified them slightly to facilitate the buffs at the sides. I tried the pattern on and it looked fine. I made first version of the sleeves, sew (by hand) the ribbons and silver thread on them, added lining and strips and tried it on to realize that the wrist area is way too small when trying it on with underdress and huge sleeves on it. So - REDOING!
I made the wrist area much larger and I was afraid it is too large (no, I should have made it slightly larger). I had limited supply of the green ribbon (I was so lucky I found ribbon with such a matching color), so I undo it from the first run of sleeve and sew it again on the second run. Silver thread took a lot of time, again.

So, the main parts of the sleeves consist of three layers - printed fabric, adhesive fabric and lining. It was still lightweight but nicely keeping its form.
Most of the time I worked with flat sleeves but in the end, I needed to sew together the some of the sides and make sure that the ribbon (using pattern to make sure it is straight was really good) and the pattern match on both sides was slightly tricky. I am just not good at all doing things very precisely. Again, basting.
The top part of the sleeves, around wrist, I sewed by hand - it was easier to control the hole situation that was slightly tricky.
Then, when the bottoms were done, I started working with the ribbons. As the main sleeve was lined, so were going to be the ribbons. I considered cutting the lining from the yellowish fabric I used for the printing but I was not sure it is stiff enough and could I be sure that all the ribbons are going to be exactly the same size. So, instead of using the yellow fabric and adhesive fabric for stiffening, I bough right color ribbon from the fabric shop. I had to visit few of those to get ribbon with right color and width. Again, I needed a lot of it. 12 stripes per sleeve. So, that made sure that all the stripes are going to have exactly the same width. Then, I cut out the main stripes from the fabric. Using the patterned fabric, it was easy to make sure they are straight. With mint green, it was trickier. In the end, I had lot of strips. Again - hand sewing! I needed to apply silver cord to all the sides. That was 24 meters and more I think. I managed to ping-watch another show while doing it (was in Narcos?). Then, I basted the main stripes over it and used machine to sew those together.


And when the cords were done, the silver thread came. It is visible from the reference images that the patterned fabric on the sleeves is covered with silver thread following the pattern. For one stripe it meant two silver threads that have to follow the shape - (not many straight lines). At one point, the both threads follow single line. I first tried to come up with a solution where there is only single thread on those places and two on others. But due to the material trying to unwind as soon as I cut and using knots was the only way to keep it in form, I decided to go with two stripes and trying to hide that there are double cords on the areas where only single line is visible.
 |
| Finished stripes with silver cord and silver thread |
So, 12 stripes with 2 threads per stripe. Another show ping watched (I think it was Underground?).

Then, when the stripes were finished (I would say the stripes took longer than tiles on the skirt), I needed to make sure I have them in right length. Because I had no pattern for it, I did some research and the way people seemed to do those were that they used usual pattern for sleeve and just enlarged it (mostly to the height). So, it was just gathering the stripes, basting then to the ribbon and testing to make sure I have normal looking sleeve. I realized that most of my stripes were too long. Even now, when I cut them, I think I could have cut them slightly more.
 |
| Preparing the sleeves. Gathering at the connections points and sewing them all to single line |
When I had perfected one sleeve, it was easy - just undoing the basting and copying it to the second set of stripes. To keep the ribbons on place, I used machine to sew the gathered stripes to the green ribbon. I got those kind of flat sleeve looking things. Then I needed to connect them - at first, again, I did not thought about the underdress. They were fine on their own but the underdress and its sleeves actually add a lot of volume. I only discovered it when I already had some pearls added (I needed a break from the sleeves at one point so I went on adding the pearls. It was more fun than dealing with those nightmarish sleeves) - so it was not very comfortable to redo it. Luckily I had enough ribbon at this point.
The second problem, again, me not thinking, was that the sleeves were sewn to the main part of the dress and did not used ribbons to connect as I first had assumed. So, I had to undo the armpits of the main dress and sew the ribbons to the lining and then, carefully, handsew the green fabric to its place. The result was nice :)
 |
| Sleeves connected to the dress but they are not holding the shape |
One problem arose - the sleeves were losing their shape when I put it on. I did some research and It seemed most people sew the undergarment sleeves onto the main dress and connected it to the sleeve to keep the shape. I wanted to have the fluffy feeling so I had two options - have three layers of fabric (stripped sleeve, fluffy undergarment and base sleeve) or have two layers and use stripes to keep the sleeve shape. I went with the second. But that mean that I was going to redo the underdress (as the itchy fabric was horrible to wear, it sounded like good prospect). I removed the sleeves, sew them by hand to the main part of the dress, fixed the fluffiness by basting it to the ribbons connecting the stripes on the sleeves. Then I added to ribbons per sleeve to (one at the top, another at the bottom) to keep the sleeve in the pace. It was lot of inventing but it worked.
The final step of the sleeves were to hand sew the bottom part of the stripes with bottom sleeves. I made the undergarment sleeves slightly narrower at the end so that they would fit into the bottom sleeves. I loved the volume they added to the stripes but it was too much extra volume for the bottom.